Wednesday, June 8, 2016
My Original Plan
Originally, I was supposed to buy a Ford Festiva for $500 and turn it into a crawler. A crawler is a car that is modified to go on all terrains. After a month's worth of research, I had realized that it would take a lot of money and time to make it a crawler. I decided to abandon the project and look for a new one. I had then wanted to build a paint booth where I would be able to paint without having to worry about paint running. It looked too easy. Lastly, I went to my last resort which was my senior project, the DatProject. The DatProject was my Datsun 510 that I had planned to restore for my senior project. Due to technical issues, I could not be able to drive to school (lights not working). The project was definitely worth it!
Tuesday, May 17, 2016
Engine Swap
I wanted to leave the engine/tranny swap post last because it was one of the more important things.
As you might have seen in the first post on this blog, the engine on the car was a piece of poop. The car had more oil leaks than horsepower. I went with a L20b engine and a dogleg 5 speed tranny. The L20b was boughten off a friend for very cheap. It had been previously been rebuilt by him using OEM gaskets and pistons. The L inside the name is the series. The 20 stands for the 2L displacement the engine consists of. And the "B" was added to not confuse it with another engine called the "L20", which was an I6 dual over head cam engine, that came in Skylines in the 70's. After buying the engine, I cleaned it up a bit(refer to cleaning section of blog). My mentor did almost all of the swap himself. The only thing I did was change one gasket at home. According to my mentor, the swap only took about 4 hours to do. Half of that was disconnecting wires, draining fluids, and prepping to lift the engine.
Since the engine we swapped in was identical to the old oil spilling pos engine, the swap did not take long. The longer part was installing the transmission. We had the transmission rebuilt by a shop in Oakland. My mentor had to grind out a little square in order for the tranny to sit flush and not hit anything.
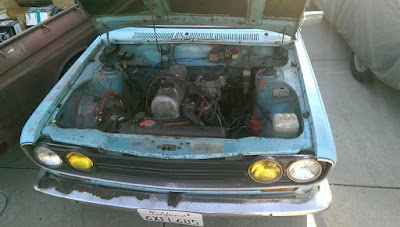
The following picture is a picture of the old engine.

Since the engine we swapped in was identical to the old oil spilling pos engine, the swap did not take long. The longer part was installing the transmission. We had the transmission rebuilt by a shop in Oakland. My mentor had to grind out a little square in order for the tranny to sit flush and not hit anything.
The following picture is a picture of the old engine.

This picture was from the week I got it. You can tell that it was a piece of sh!t at first. It also ran like crap too. The carburetor bogged a lot as it was old and worn out. However, we did purchase a new 32/36 electric choke carb online a while back in Junior year. I had then gotten a couple of things done to it. I took it to a local shop that also works on Datsuns. I had a valve adjustment done there. As I l mentioned before, there was a large oil leak in the engine, the mechanic suspected that the fuel pump was the issue because there was signs of oil dripping from it. We changed the fuel pump gasket and spacer, however that didn't solve the problem. Here are some pictures of the replacement of the parts.
Here are pictures from the swap, we used a forklift because we didn't have a cherry picker!

I chose this entry to be last because it was something that I believed was very important!
Final Tweaks
After semi completing the project. I still had yet to tweak a couple of things. I started off last weekend stripping all of the old black tape that held the wires together. I took all of that crap off and found a lot of oil from the old oil leaking engine. It was disgusting. I went onto eBay and bought a ton of split loom, 100 feet of it. I had ordered the 3/4 inch piping to hold the wiring a little better. In total it took about 3 days non stop to do. However, it was all worth it at the end, I had a nice looking engine bay. I also tucked away a couple of wires.


Tuesday, May 10, 2016
Headlight Update 5-10-16
I managed to get help by the people from where purchased the lights. They diagnosed the problem, then concluded that the stock wiring harness couldn't supply enough current for the HIDs to turn on. What they did was put another wiring harness so the headlights got a constant voltage. The new harness also makes me eligible to use 4 way high beams. They told me that the harness uses power straight from the battery rather than from the harness. The installation was quick however, there's a whole bunch of wires around everywhere. My next task is to wire tuck the harnesses and use split loom to make it look a little nicer.
The following picture shows the people at Dapper working on the headlights.

I still have yet to adjust the the headlights so I don't blind oncoming traffic. I will also be taking before and after shots of the headlights in action.
The following picture shows the people at Dapper working on the headlights.

I still have yet to adjust the the headlights so I don't blind oncoming traffic. I will also be taking before and after shots of the headlights in action.
Sunday, May 8, 2016
Headlight Upgrade Installation
The HIDs are here! After using stock halogen sealed beams for more than a year. I have come into conclusion that stock sealed beams suck. In February I had seen a couple of people posting on the forum I go to, ratsun.net, about some new Dapper Lighting HID lights that are made for old cars like mine. I was interested so I pre-ordered them. They were release early May. I was one of the first to get them in my hands. The lights I chose were 6k 55w HID lights with a modern LED halo light on the outside. The low beams use HID bulbs while the high beams use halogen bulbs. The installation was fairly simple as the kit came with a plug and play harness. However, I have encountered a couple of problems such as blowing fuses. The halo lights were wired directly to the parking lights (which was not a good idea). I still have to find the problem of the fuse blowing. For now I'll put a bigger fuse on it. Here are some pics.
Here is a shot of the car with the stock lights on. This was shot right after I picked up the new HID lights. You can note that the old lights don't look very appealing in my opinion. They don't preform as well either. The high beams were not connected at that point.

This is the box in which the HID's came in. Very nice packaging for the lights.

 One last shot before the headlight installation.


The new lights were very simple to install, the wiring on the other hand was quite hard at first. However, I realized that everything was plug and play... It cleared up a lot of things. There was one thing that this kit had that a lot of other kits don't. That is the H4 to H11 plug. One thing that annoyed me was the halo lights. The way I installed it was very bad, a way I don't recommend. In the above picture you can see the orange turn signal. The turn signal was wired bad since I got it. If you hit the brake, the hazard lights go off. And when I tapped into the turn signal lights, every time I would brake, the halos would go off. But I swapped a bigger fuse and it fixed the problem, for now at least. Overall the installation for the HIDs was easy. I just need a fuse for the low beam to work. The following pictures are of the halo lights on.


Here is a shot of the car with the stock lights on. This was shot right after I picked up the new HID lights. You can note that the old lights don't look very appealing in my opinion. They don't preform as well either. The high beams were not connected at that point.

This is the box in which the HID's came in. Very nice packaging for the lights.

Lights straight out of the box, very sharp and nice.


As for the installation, I had to do this one by myself because my mentor wasn't available. I first removed the grill off the car. It was only two screws and two bolts that held the grill on. After that I removed the headlight bezel, exposing the two lights on each size. I noticed that one of the headlight rings was broken, thus creating a lot of play within one of the headlights. I had two extras so I swapped a newer one in.


 |


The halo lights are so crisp and sharp that my camera can't even pick them up. In this entry I learned how to install HID lights. Since HID kits are all basically the same for every vehicle.
Thursday, May 5, 2016
Exhaust system completed (Beginning of Time)
When I first got the car, the muffler was cut off to make it louder and more obnoxious. It sounded cool for the first couple of months but then as I was learning stick at that time, it became irritating. Taking it on the freeway was a nightmare as you'd come out of the car deaf. I took the car to a local muffler shop named Jay's Kustom where I had planned just to put a muffler on the stock exhaust. However, Jay convinced me that adding a whole new exhaust system would not only make it sound better, but it'll increase the performance. I went with a 2 inch full pipe from the headers I believe to the back where a Magnaflow exhaust was placed. The car has a nice mellow rumble to it compared to the loud raspy obnoxious sound it had before.

Picture above: The car on the car lift. I believe he was removing the old pipe at the time.

Here is the old piping. Obviously you can see that it's been there for a while and has started to rust. It was pretty smelly.
After an hour and a half of welding and cutting, Jay got the whole exhaust done. Immediately, I could feel the power gain and the smoother drive it had.


Steering Wheel Installation
Before I finished the interior, I forgot to mention that I installed a brand new Grant steering wheel. The old steering wheel was held on basically with one bolt. The old steering wheel was also very old, and when it would get hot, the black plastic would melt off and your hands would turn black. I choose the Grant steering wheel because it had a mix of vintage racing, and modern style wheel. The installation was quite a head hitter, literally. When I took out the first bolt, then the one that prevents the wheel from flying off, the steering wheel went flying into my head, and it hurt...


Old steering wheel.
Before anything, I called my mentor to see what to do, he told me to align the wheels as straight as possible. As you can see, there is one bolt holding the steering wheel. The larger bolt just prevents it from going into your face. I got a 10mm socket and took out the first bolt. Then I got a 4 way lug wrench to remove the 11/16 center bolt holding it together. It was on there quite nicely as it was hard to remove. After removing the bolt, I had also removed the hub adapter by using a hammer.

Left old. Right new.
Here is how it looks w/o a hub.


After setting the wheels straight before the procedure, I had then used a hammer to set the hub as flush as possible, without breaking anything. I also placed a piece of cloth between the hammer and the hub to prevent any damage.

Now it was time to install the steering wheel, this time the right way. It helps to have aligned the wheels as straight as possible so your steering wheel isn't screwed up.

The steering wheel installation is the same as the old one, however this time I needed to install a horn button. The horn is quite unless as you can barely hear them, so no need to install it.

When I took this photo, the steering wheel was not aligned. I went back another day to straighten it out since the steering was screwed.
Now for the final result. I have token a recent picture showing the carpet, seats, and steering wheel all installed.

I will be taking some pictures of the current state of the project this Sunday.
Subscribe to:
Posts (Atom)